Want to see the tools and containers I actually use? Start with Shop HOMe →
“Tiny wins, calmer rooms, and gentle resets for real-life homes.”
Gentle home organizing for real women, busy minds, and messy seasons of life.
-
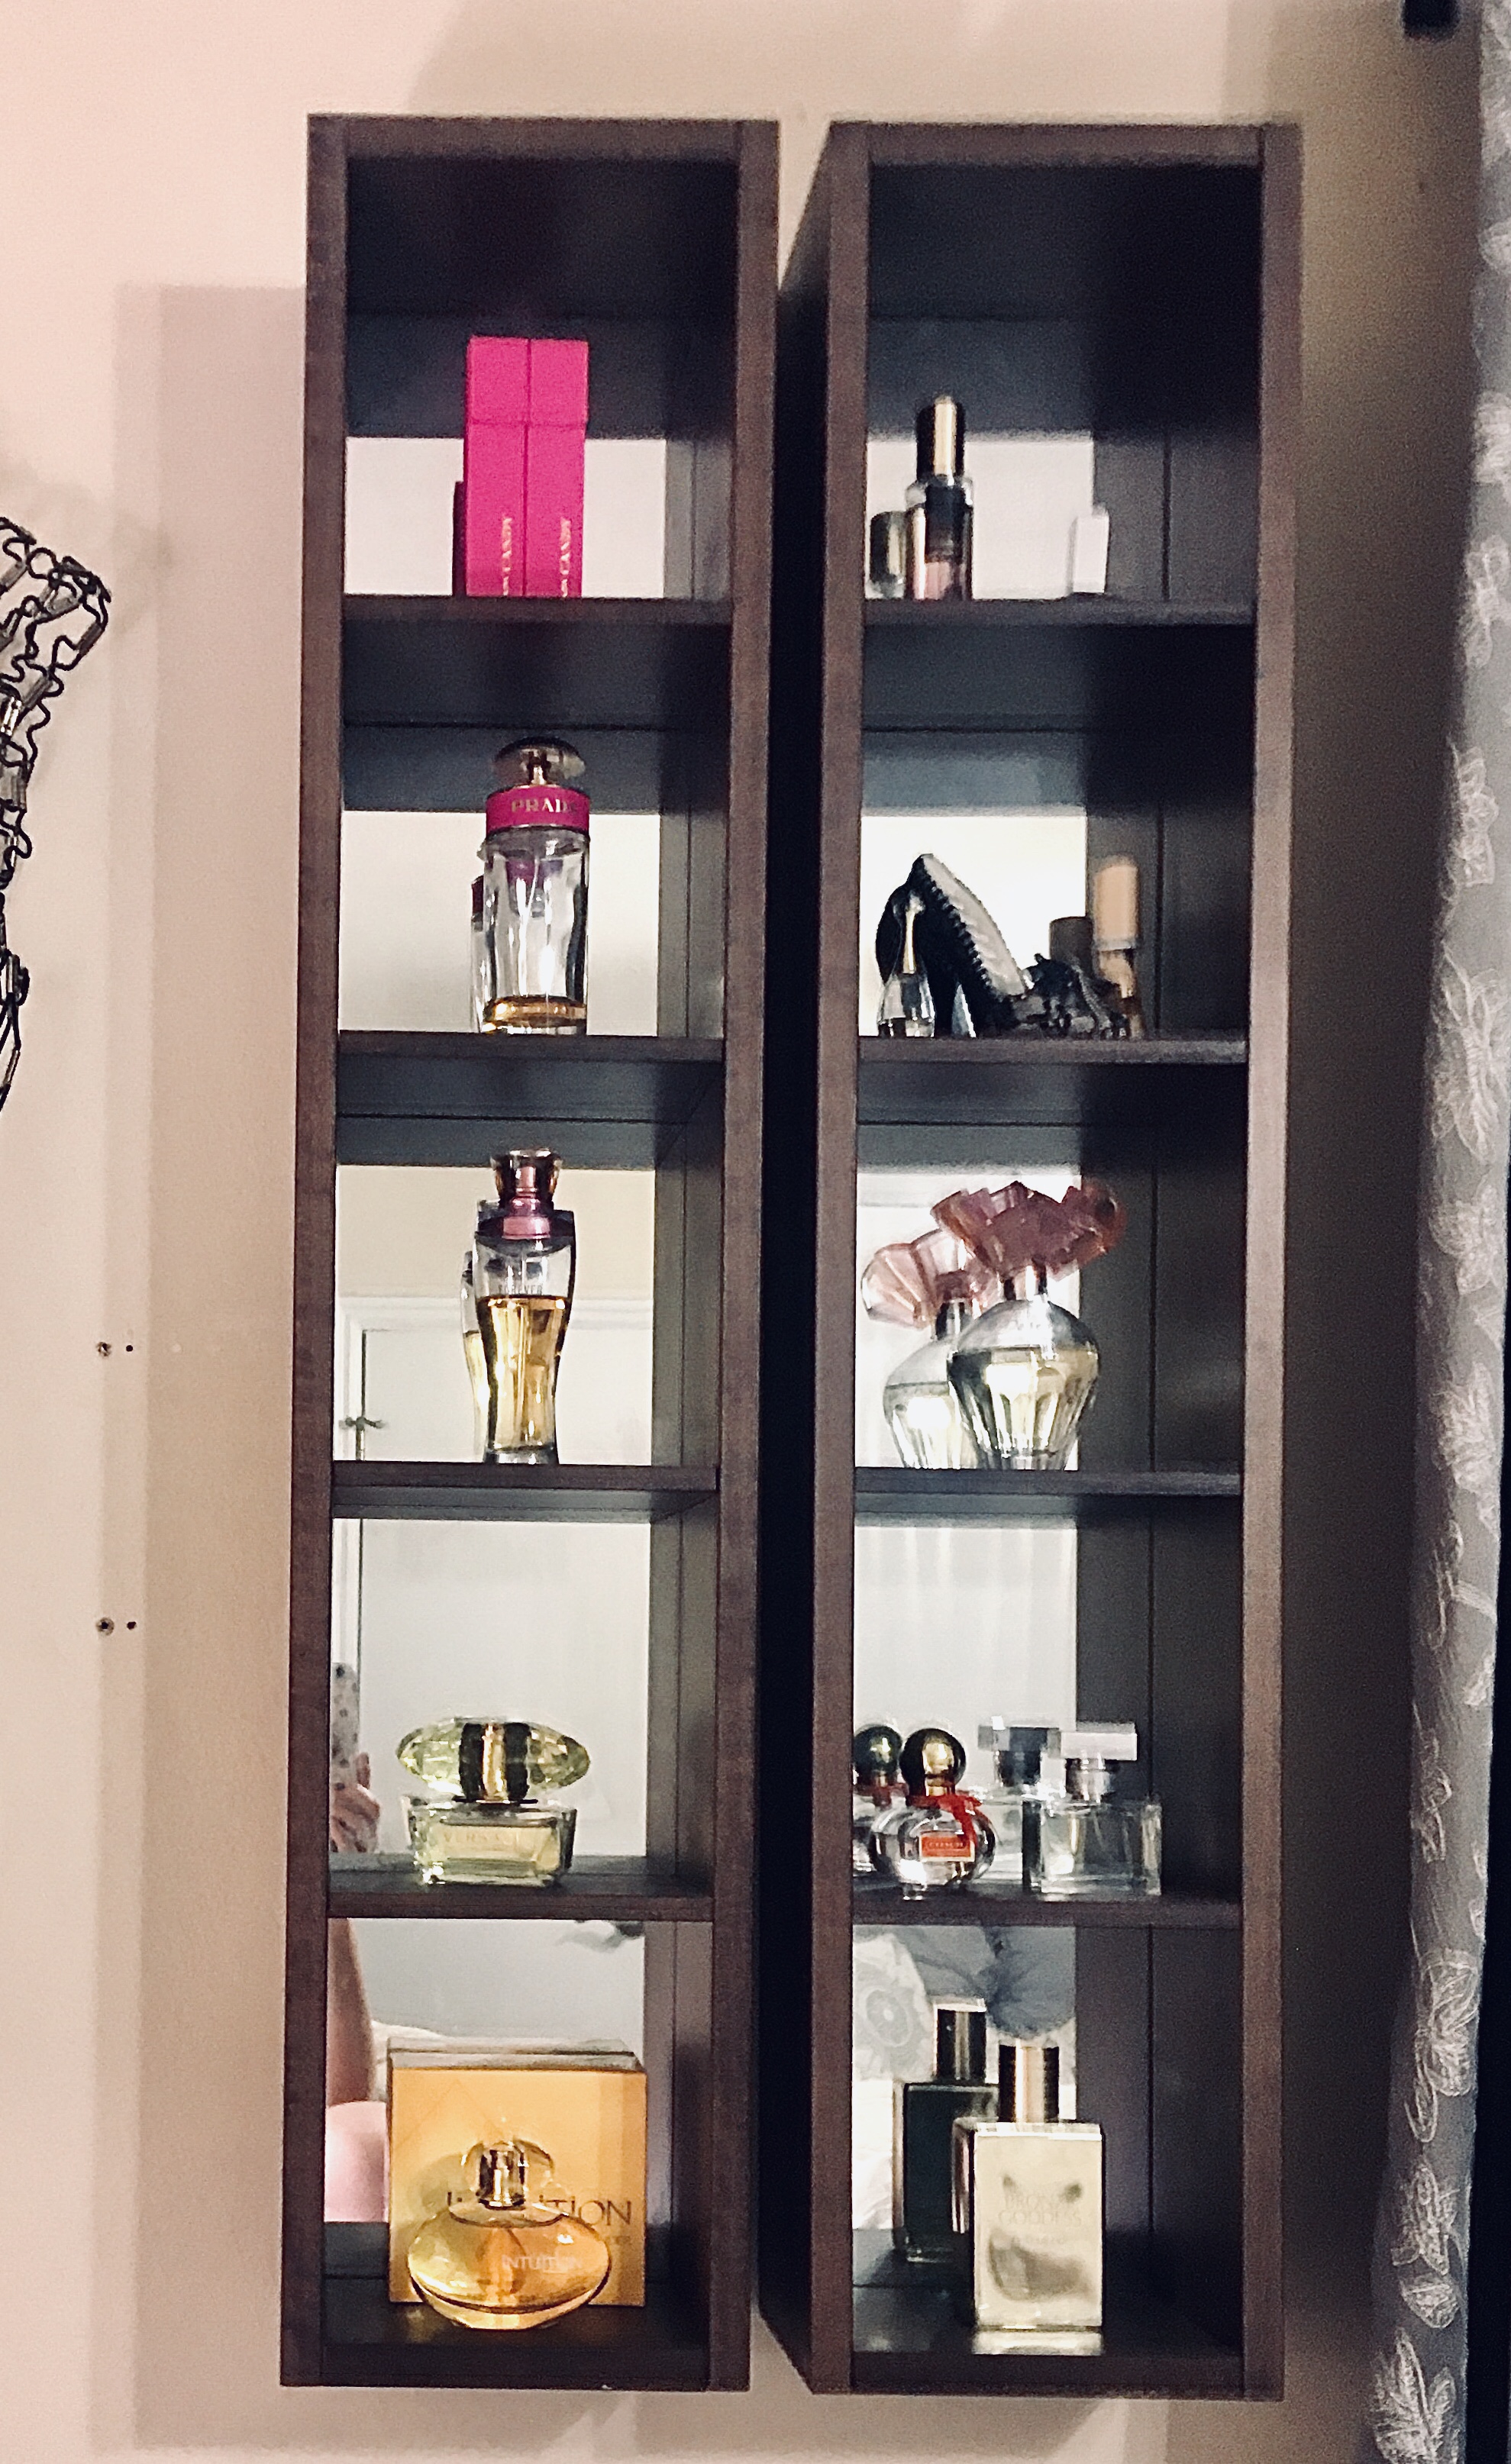

Perfume display cabinet Whether you have one bottle of perfume or you are a collector of perfume, and you have many bottles. You still have to put your perfume somewhere. Some store their scents in their purse and take it everywhere they go, reapplying all day. Some keep it in the bathroom, apply once and they are good all day.
News flash those are two of the worst places to keep perfume.
If you have many bottles of perfume a cabinet with a mirror is a beautiful way to display all of your gorgeous bottles of perfume. However if you have only one or two scents in your collection, you might keep them on a mirrored tray on top of your dresser.
Keep in mind there are rules for keeping your scents good. However, a rancid bottle of perfume is like being sprayed by a skunk. It is really hard to get off of your skin fast enough and stinks for days.
Rules for storing your alluring scents.
• Keep the lid on, oxygen begins to degrade the scent from the very first spray.
• Store your perfume in the dark. Both man-made light and natural light can alter the sensitive DNA of your perfume.
• Keep your perfume out of the bathroom. The moisture and temperature fluctuations will wreak havoc on your expensive scents.
• Maintain a stable temperature. I can’t reiterate this enough. Temperature fluctuations will break down the DNA in your perfume. Treat your perfume like the pre-Madonna it is and keep it at a perfectly balanced 60 degrees.
• If you need to travel with a bottle of perfume in your purse keep it small. The smaller the better. When you are at the perfume counter ask if they have samples of your favorite scent or buy the smallest bottle available.
Signs your scent has gone bad.
• Discoloration • Diluted scent •Cloudy • Oily • Stinky • Smells Off.
Throw it away. There is no saving it at this point.
No one wants that.
Summary:
Keep in the original bottle. Keep in the original box. Don’t shake it. Keep it cool. Keep sealed till you’re ready to use.
-
Fresh herbs are so delicious. You can enjoy them as early as mid spring from your garden or all year long growing them indoors. There is nothing better then a beautiful warm spring day, going out to your garden or farmers market and getting a few bunches of your favorite herbs.
What happens when the season change, the first frost is looming and you have large bushes of herbs in the ground. They brought you so much joy to all of your cooking spring, summer, and most of the autumn. Do you just leave them to freeze, and die on the stem? Hoping they come back next spring.
Of course you don’t waste all that you were blessed with. You choose to take the proactive approach and you chop the herbs a few inches from the base. Before you chop you tie a snug knot a few inches above where you plan to make your cut.
Now you have a huge bouquet of herbs. Find a dark place with some air flow and hang them to dry. Depending on how thick your bunch is, it could take anywhere from a few weeks to dry completely to a few months.
Maybe you are a little more techie and you use your air fryer’s setting to dehydrate your herbs, in smaller batches of course. Then again you might take the plunge and invest in a large freeze dryer dehydrator machine and get the whole bushel of herbs done a few hours.
That’s great now it’s time to store you bounty. You want to do this right. You made sure everything is dry so no chance for mold, ewe gross. Then you have to decide, do you want the leaves only, or do you keep the stems too?
A decision is made and you choose to keep only the leaves. How should they be stored? In a zip bag? No! The oils in the herbs could cause leaching from the plastic, so that rules out plastic jars as well. Not many options left. Brown paper bags, or glass jars? Let’s go with glass jars! Dark ones are best to shield the herbs from the light. No dark glass jars laying around. No worries just put them in a drawer. Hmmm, jars to big for a drawer? A closet is a great cool dark place to store your freshly dehydrated herbs.
Maybe you want to display your beautiful herbs on a shelf out where you can see them. Sure you can do that. Just keep in mind your herbs will not last as long out in the light.
There are many options for jars. No need to run out to the store for new jars. You can use empty pickle jars, carefully washed and thoroughly dried. Old mason jars are great as well. Get creative with your jars, use different sizes, shapes, and colors. This will make your herb display shelf look amazing.
Herb Shelf -
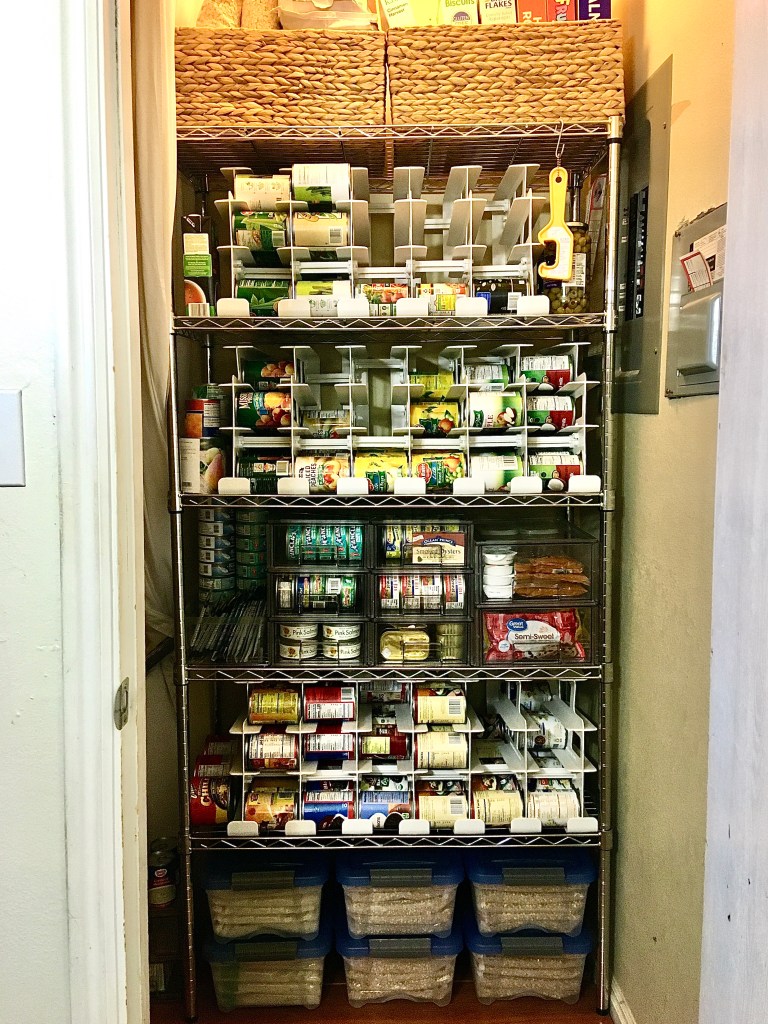
Recently my daughter Chelsey agreed to let me help her organize her kitchen. More so just the food in her kitchen. It’s a small kitchen in a cute little apartment. Very vintage 1960’s.
Some of the challenges we were up against in her sweet little kitchen. There is no pantry! Yes, you heard me right, there is no pantry in this little kitchen. The cabinets in this kitchen are shallower and shorter then the modern cupboards of today, and the shelves are not adjustable.
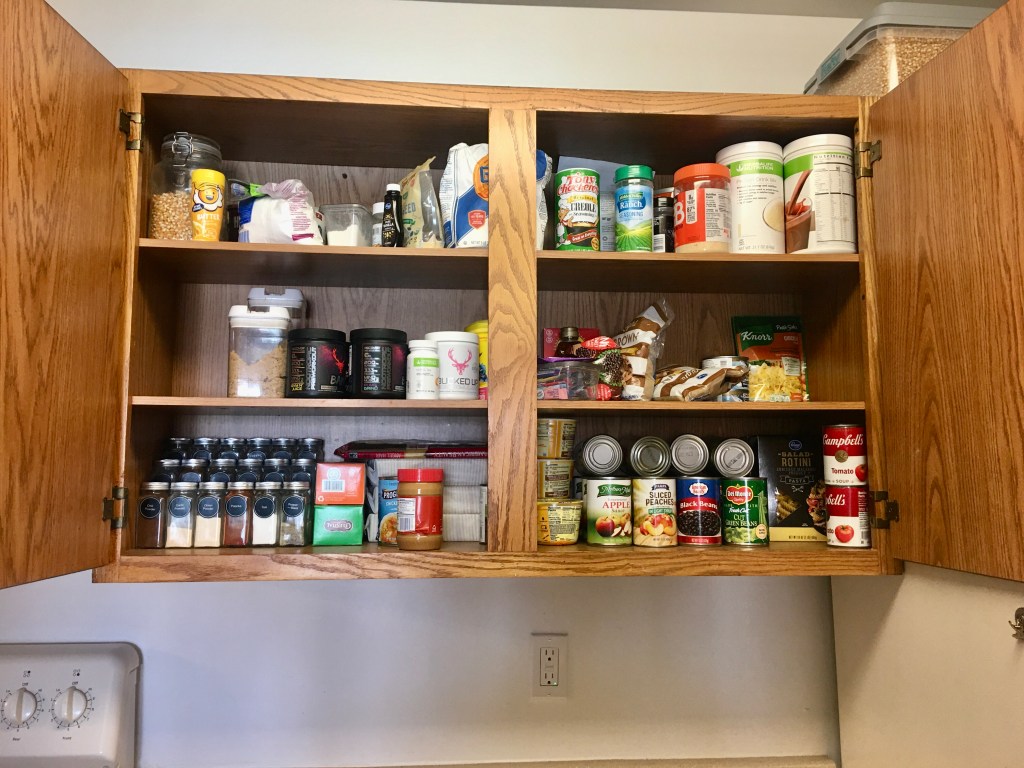
Food cupboard Where we began. Chelsey’s husband Tony took all of the measurements, length, depth, and height for each level. Chelsey took photos of each space that held food, and sent all of the information to me.
I took the information they gave me, sat down with my graph paper and began sketching. First I drew the cabinet to scale.
Then on the back of my graph paper I made a list of the food in the cupboards based on the pictures Chelsey sent me. Then I drew each container and labeled it’s contents.
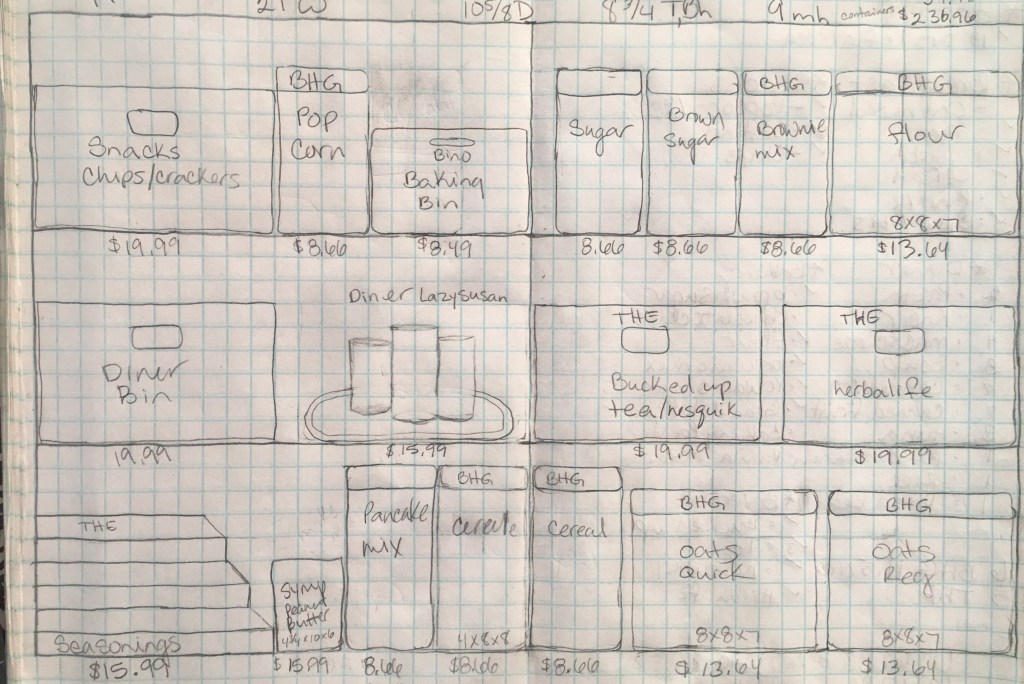
Food storage draft After all of my preliminary research and planning. I went to the internet to figure out the best containers to buy. I found the food containers at Walmart (Better Homes & Gardens) and the clear bins at The Container Store (The Home Edit) collection.
I put the food items into groups, placing like items together. The first level was seasonings and breakfast item’s. The second or middle shelf was dinner and drinks. The top shelf was snacks and baking. With a few adjustments from the drawing everything fit just right.
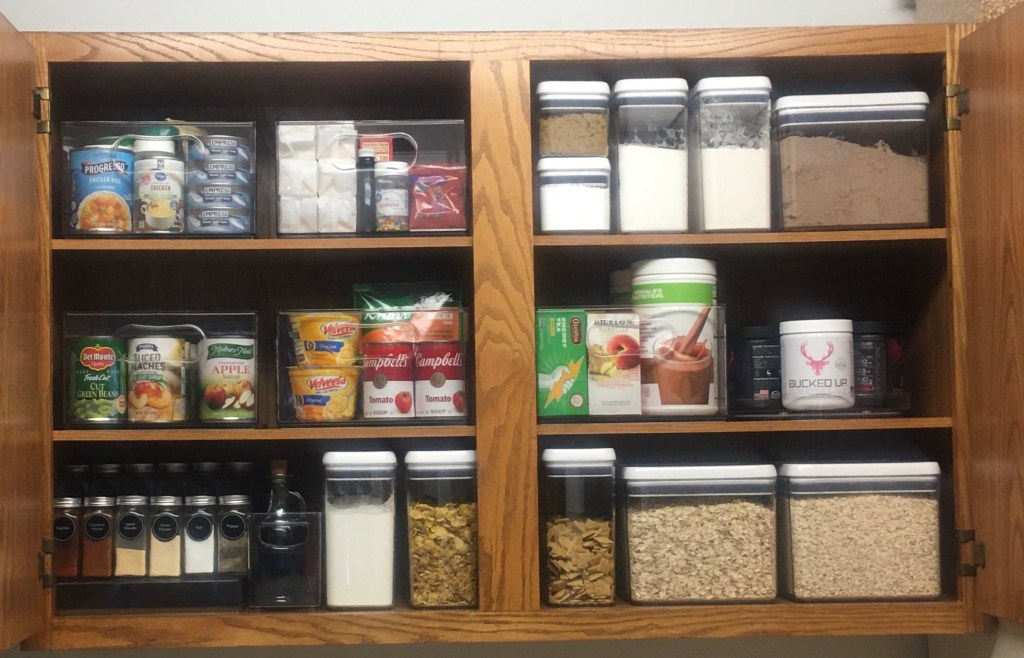
After After filling each container, the remaining contents of each bag was rolled up and placed in a basket labeled back stock, and place above the refrigerator.
Back stock Large bulk foods such as beans, rice, and popcorn were placed in extra large containers above the stove.

Bulk foods The price for all of the containers came in just under $400. The time it took to complete the project from beginning to end about 5 hours.
You can see more pictures and videos of this project at the links below.
If the button does not work copy and paste the links below.
https://www.instagram.com/reel/CbV47DIga_7/?utm_medium=copy_link
-
With so many of us working from home these days, a home office and/or desk is a must. The trick is keeping household office needs such as bills, and todo lists separate from work office needs. (That can be so much more then you might imagine).
Setting up a home office can really set you back financially, be sure to sit down and work up a budget. Read “Track your debt and budget”, Need help with budgeting go to the link below.
http://boringmomstuff.com/2022/03/10/track-your-debt-and-budget/http://boringmomstuff
there are great simple budget friendly forms available.
It’s important to have the right equipment in your office for it to function properly. Desk organizers come in various sizes and shapes. They are used to organize what you need to get your job done.
A comfortable, and supportive chair is a must. Good lighting is an absolute must. You will need both overhead lighting, and a good adjustable desktop lamp.
Adding a natural element to the space like a plant will help the space feel a little more relaxed.
How to organize your home office desk, to do everything you need it to do and so much more.
Step one: Empty everything from the surface of the desk and each drawer. Wipe everything out!
Step two: Sort and group belongings into categories. Such as… writing (pens, pencils, and markers) then sub categories, divided by color or type ie: permanent and dry erase. (If you have an abundance of supplies, bag up the extras and take them to a local school. They are always in need of supplies).

Home office -
Herbs and spices, we all have them. We use most of them, sometimes. Some of them we never use and have no idea how or when to use them.
Do you ever remember when you got them? You know the spice’s sitting over there in the corner of your kitchen. Maybe, when you got married or maybe for Christmas. You know they came in a cute little holder 15-20 matching bottles. It looks so cute on your kitchen counter. You almost never notice it anymore it’s been sitting there so long. You use about 50% of the herbs & spices, and the rest just sit there and collect dust. Did you know spice’s don’t last forever? Weird, right? They actually last about a year or two, then they are expired. With the exception of the salt and pepper which will last a little bit longer, but that’s the spice you use on a regular basis and has probably been used and refilled.
First things first, gather all of your herb’s & spice’s and check for any that have expired. toss them out.
Make a list of herb’s & spice’s that need to be replaced. (Only replace what you really use).
Count how many herb’s & spice’s you have and order some really cute jars and labels.
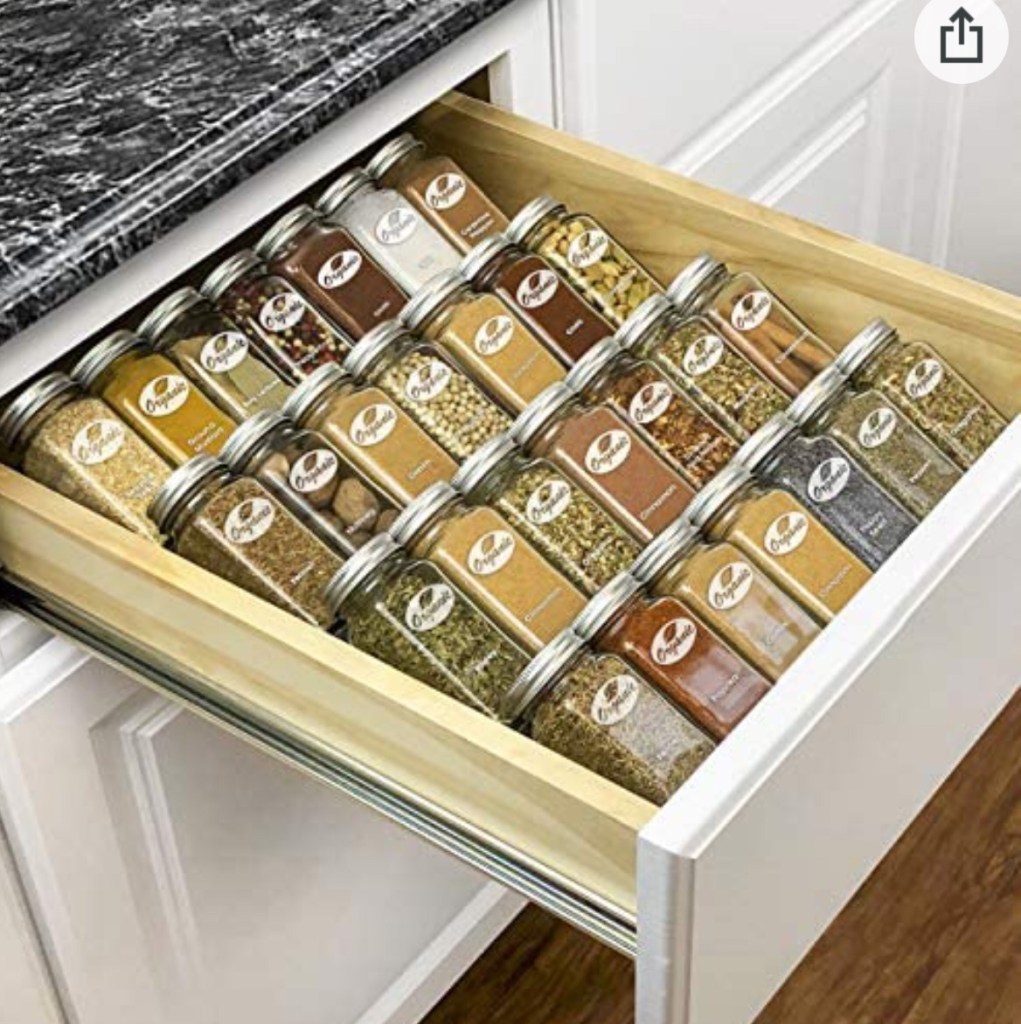
Spice drawer Fill and label all of your cute new jars. Place them in a drawer or cupboard.
Happiness achieved.
-
One might think there is nothing to organize in a dining room, maybe not, or maybe there’s more there than meets the eye.
We can all agree that at the very least a dinning room has a table and chairs. Some may even have a rug under the table. A valuable and sometimes overlooked piece of furniture would be a hutch. A hutch is a cupboard usually surmounted by open shelves. Maybe you were blessed with a China cabinet very similar to the hutch, but it usually has glass doors to protect the China from dust.
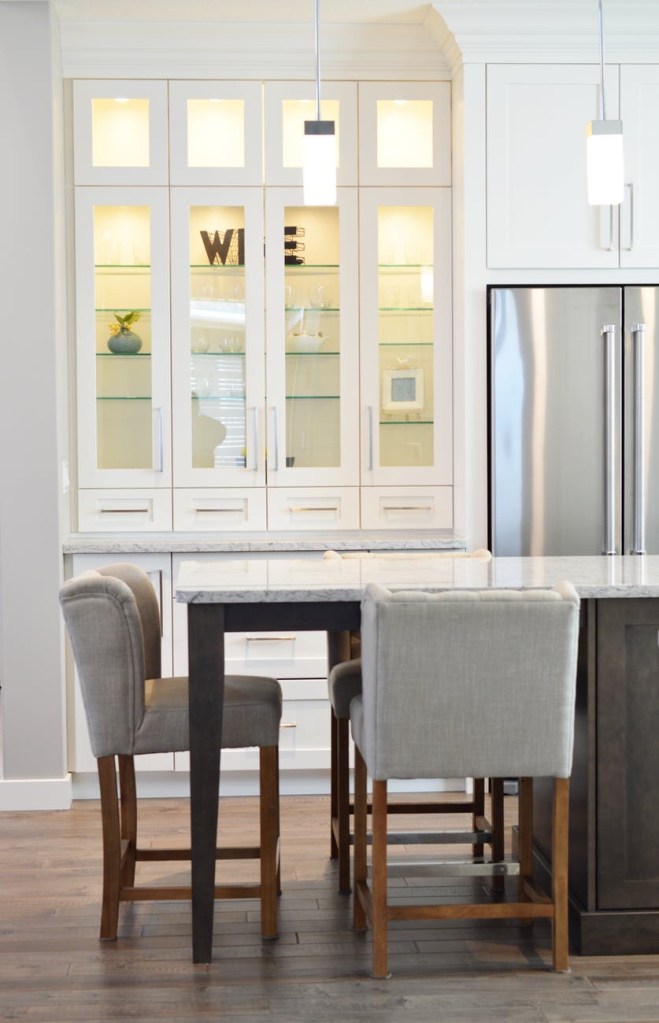
China Cabinet A buffet or sideboard does not have shelves above it. However, it is used very much in the same way, holding formal or special occasion dishes. The buffet also serves as a surface area for placing dishes or trays of food.
Buffet/Sideboard Keep everything in this space simple.
Step one: Remove everything and clean it out.
Step two: Purge, edit, donate, and toss, everything that does NOT, bring you joy/happiness, and you can’t see the future with out it.
Step three: Contain; group like items, and like colors. Line the shelves and place everything back inside the cabinet.
This is also a good place to store napkin rings, napkins, placemats, table runners, and table clothes.
Update the rugs and pictures on the walls and you are ready for a dinner party.
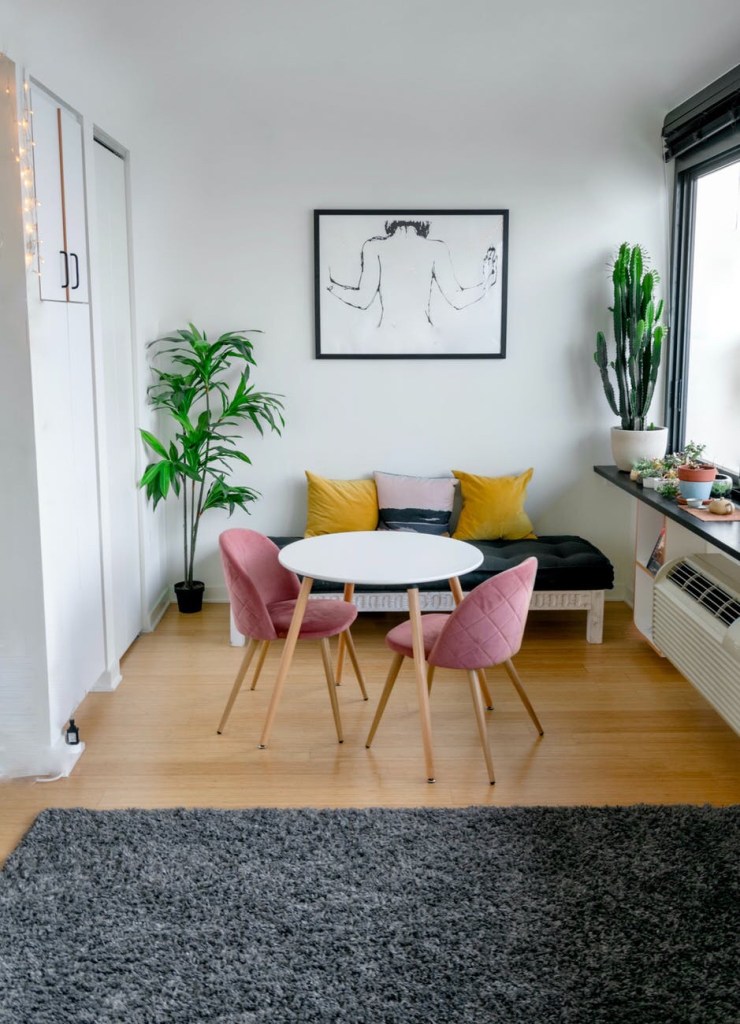
Simple dining room -
Food storage anywhere With all the unrest in the world, people are increasing the quantity of food they are keeping in there homes. From the average 1-3 months worth of food to 6-12 months or more worth of food and essentials for our homes.
We not only keep our food in our kitchen cupboards and pantry closets we are turning bedrooms, bathrooms, and even sections of our garages into makeshift storage for our families. Some homes come with cold storage in the basement usually under a patio. Now, more then ever we need to know what we have, where we put it, and when it expires. Remember this is the ultimate in back-stock and must be rotated into your main food pantry before getting more. This will minimize waste and over purchasing.
First word of advice. Keep and store only what your family actually uses, and likes. Otherwise it will most definitely expire and that just becomes a waste of money and valuable space. No one wants that!
Step one: Choose your space. Spare bedroom, bathrooms, or extra closet. Then clear it out and clean it. Wash walls, patch any holes, baseboards, paint ceiling to floor, mop or vacuum. Wow it looks great! Now your ready to bring in shelving.
Step two: Take measurements length, width, and height. Now for the fun part, you get to pick how you want your space to feel.
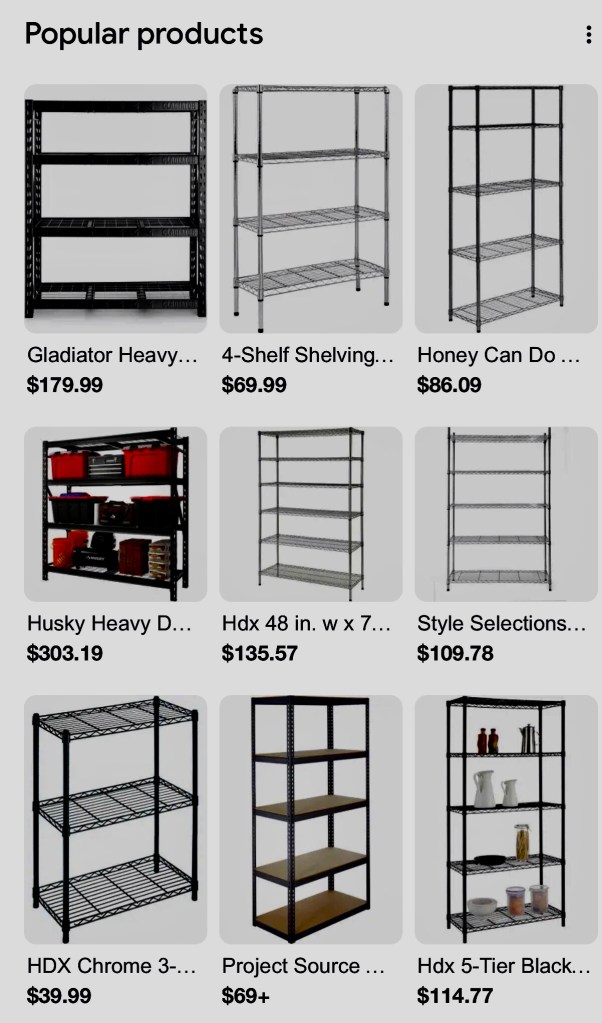
Pick metal shelves for a more industrial feel. Metal will also hold more weight and are easy to sanitize. So if you have a lot of very heavy food this could be a good option. Available at your local hardware store.
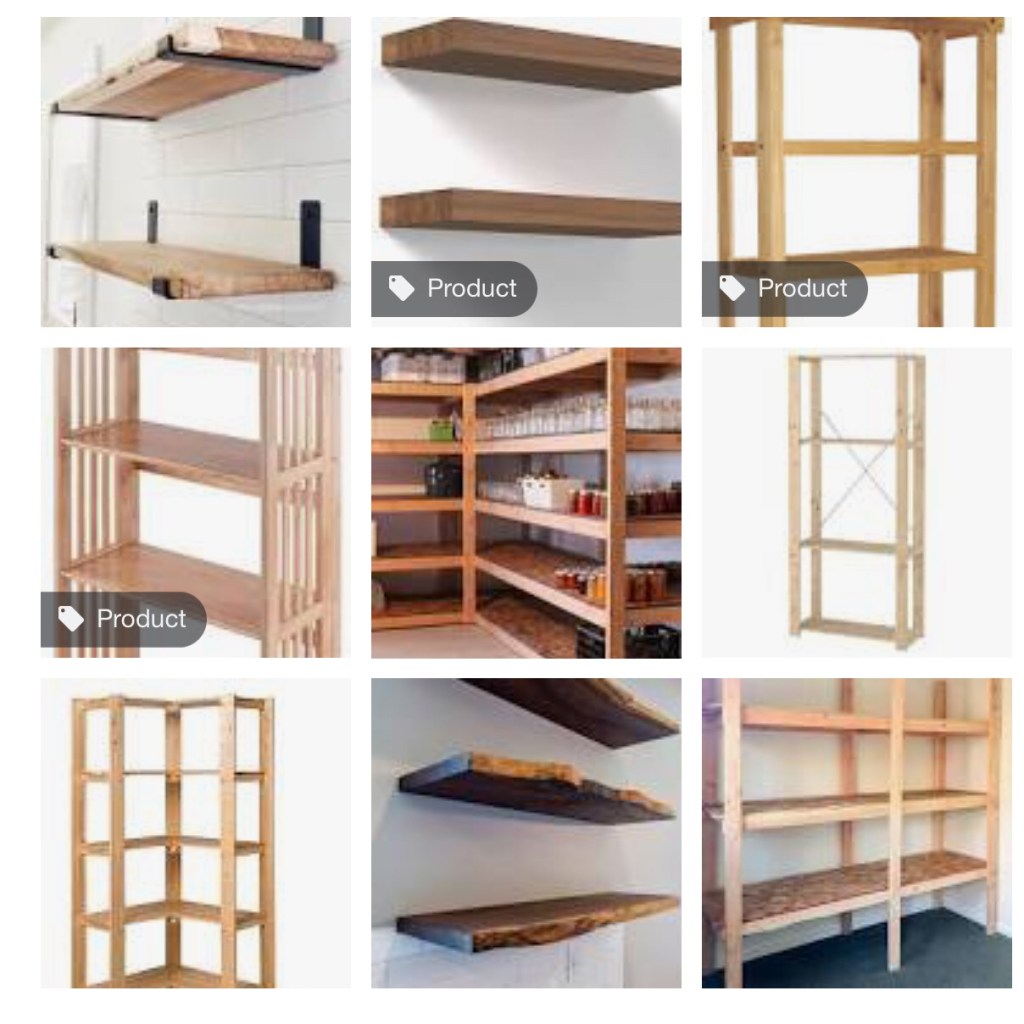
Metal shelves Wood shelves have a warm homie feeling about them. If you are making shelves where the color and grain of the wood is an important part of the design, look for oak, maple, or cherry plywood—these options will still offer durability and beauty, but will help keep costs down.
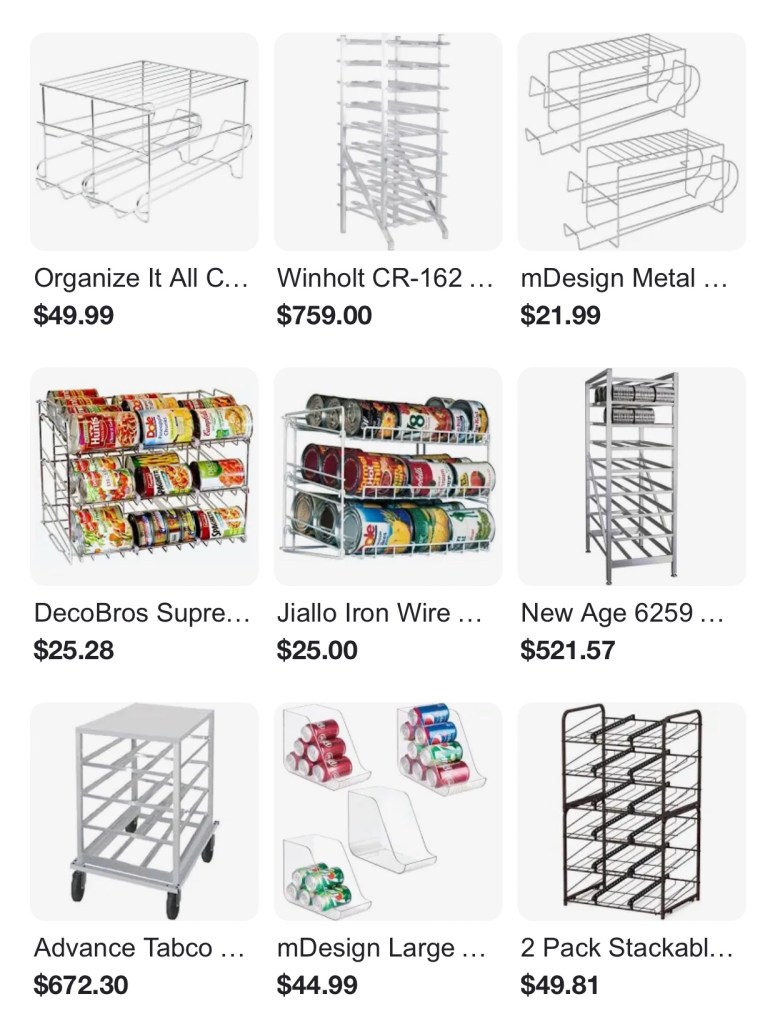
Wood shelves Step three: Choose storage containers. The right storage containers are a vital part of your back stock. Bins, baskets, and can racks will all be needed in this space. Rotation is key to keeping your food fresh and edible.
First in first out Step four: Sort, edit, and purge everything. Check for any expired foods. Let’s start with all good usable food here. Separate into categories ie: snacks, baking, proteins, fats, seasonings, dairy, and fruits and vegetables. You can do as many categories as you feel your space needs or makes sense to you and your family.
Step five: Group like items together into bins, baskets, or can racks and place them on the shelves. Continue in like manner till all of the groups and categories are in their perspective spots.
Step six: Label everything bins, baskets , and can racks.
Way to go! Your food storage looks better then the grocery store.
Back stock (food storage) 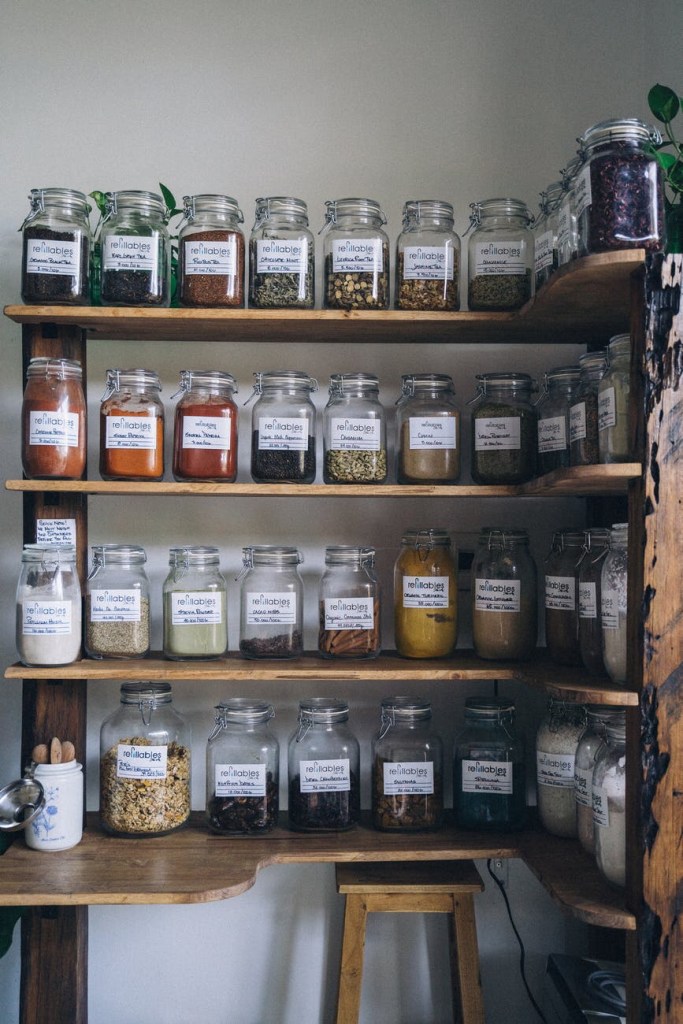
Food storage that works for you Subscribe to HOMe Newsletter
Get more in-depth information in our Newsletter
-

Guest bedroom to die for If I stayed in a guest bedroom like this I would never want to leave.
A guest bedroom or spare bedroom is a highly overlooked room for decorating and organizing. A guest bedroom houses the basics. A bed, two nightstands, lamps, and a dresser. A very comfortable space for someone to stay (temporarily).
There is untapped potential in this room. A bottom drawer in the dresser can house a beautiful baskets to hold spare sheets, extra blankets, and pillow cases for the guest.
Another drawer could hold fluffy soft bath towels, hand towels, wash clothes along with soaps for bathing. (If you have enough space you could even place all the bath pieces in a beautiful basket and place it on a table, dresser, or shelf.
Gift the candles and soap The nightstands can hold extra boxes of tissues, hand sanitizer, and candles. A stylish bookshelf is a great place to store some of your favorite books, your guest might enjoy reading late at night.
Remember to finish off the room with a few details that are oftentimes overlooked. Curtains that complement the comforter on the bed. A bed skirt that matches the comforter.
A rug at the end of the bed, or a large rug that starts under the bed and comes out 3-4’ around the bed for warmth one comfort. (Example in picture above).
If there is room place one, or two chairs with a small table in the room. If there is not enough room for chairs, place an upholstered bench at the end of the bed. If you were blessed with an extra large room do both the bench and the chairs.
Having a complete guest room can help both you and your guest feel relaxed. Happy visiting.
-
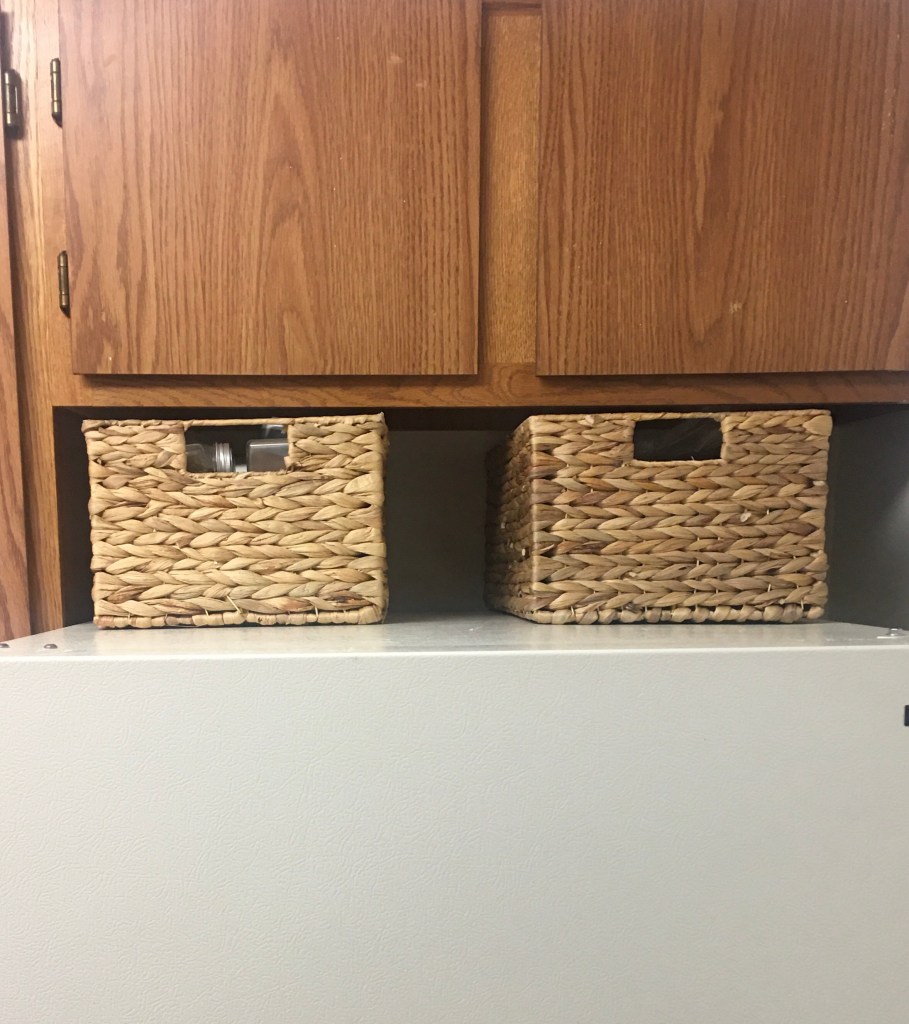
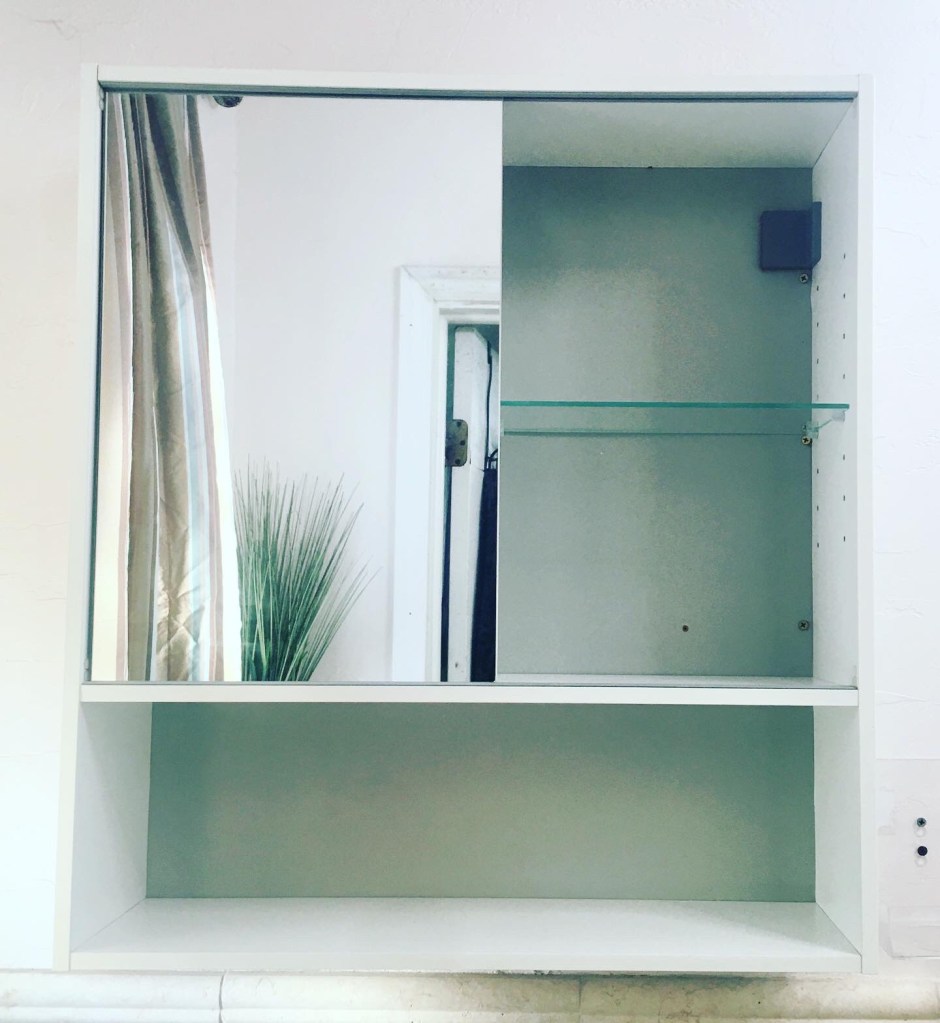
The medicine cabinet also called a bathroom cabinet, is usually located in the bathroom. Some use a medicine shelf, drawer, or even a basket. Well, in my case, I use a medicine cabinet located in my guest bathroom, and a medicine shelf, located in my kitchen next to my refrigerator above my vitamin shelf. (Wow! That’s a lot of personal information).
Not all homes come equipped with a medicine cabinet. Not sure what a medicine cabinet is used for or how it’s supposed to be used. I’m here to help. A medicine cabinet is a small storage space usually located in a bathroom, either above the sink or toilet. They are designed to hold everyday get-ready essentials like toiletries, medicine, and hygiene products. If you want one, and your home is not equipped with one a handyman can help you install one.
Let’s start with containers, what containers are best to use in a medicine cabinet? Start with measurements of the the shelves you will need the length, width, and height (the space between each self, so you know the tallest containers for the space). The containers I used for this project.

Step one: empty cabinet and wash shelves, mirrors, and walls.
Step two: purge, edit, and sort. Check for expired product. (I found some cream from 2007)
Step three: figure out which large containers fit the different spaces. Then fit smaller containers into the large containers to divide the categories.
Step four: place everything into the cabinet. Space containers and products so it feels good.
Step back and feel the joy 🤩


Subscribe to HOMe Newsletter
Get more in-depth information in our Newsletter

